Capture One Pro 20, the newest version of the image editing software, was released in time for the new year, and a new decade (hence the name, a numerical jump from version 12 to version 20). Like most software releases, it adds some notable features and improvements, complemented by nice-to-have but not mind-blowing updates.
You can find a complete list of all version 20 updates at www.captureone.com. (And check out our news story about its release, announced in December.) Meanwhile, we took a close look at what we consider some of the more significant changes. Many of the updates were in response to user requests and there are a couple of what-the-heck-took-them-so-long improvements.
New Basic Color Editor
While you still have a choice of Basic, Advanced and Skin Tone color editing options, the Basic Color Editor has a few updates, including two additional color patches for a total of 8 and the ability to work on layers.
But the new feature that really caught my eye is its Direct Color Editor. Designed for quick, easy and more precise adjustments, its new cursor tool allows you to click directly on an image to select a color, which then appears as a color patch (or patches). From there, hold down the cursor and move it horizontally (left/right) to adjust the Hue. Move the cursor vertically (up/down) to change saturation or, in combination with the Opt/Alt key, to change lightness/darkness. You can see the changes reflected in the sliders while moving the cursor. Of course, the same effects can be implemented by choosing a color patch and manually moving the sliders, but the new cursor tool speeds up the process, is much easier to use and is more exacting.
If there are other areas or objects within the selected color range that you do not want adjusted, all you have to do is create a layer mask to isolate the target area/object and use the Direct Color Editor cursor to make the changes—another benefit of being able to use the Basic Color editor on layers.
Scrolling and Pinning
The Tool Tab has been redesigned for efficiency and customization. You can quickly scroll to the tools of your choice with the scroll bar but, perhaps more importantly, you can now pin your most frequently used tools to the top, in whatever order you prefer. Each arrangement can be saved as a separate workspace so it can be recalled at will. The combination of pinning and scrolling— particularly the former—really saved time, since I was able to quickly access the tools I needed.
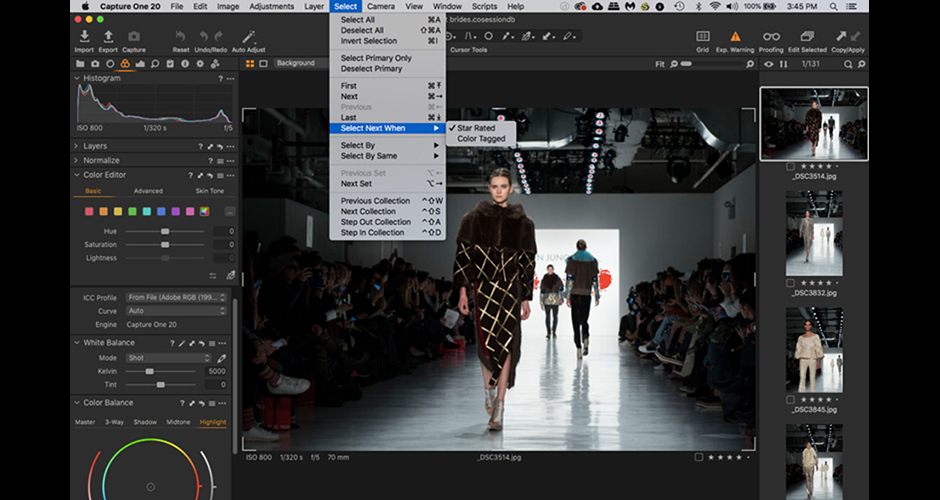
Select Next When
Set up Select Next When and the program automatically advances to the next image after a star or color rating has been applied. It’s a real time saver when you’re rating images especially if you’re culling on deadline and every keystroke counts. While this feature works best with Sets (to use, disable Edit All Selected Variants first), it’s also effective for going through single images.
From the Select drop down menu go to: Select Next When. Choose star rating, color rating or both. Then start rating the first image. You will then be cranking through ratings in half the time it used to take. I can’t wait to use this feature during NY Fashion Week, when I’m in a real time crunch and need to rate and cull images quickly.
Improved Copy/Apply Layers
Sure, copying a layer and applying it to another image isn’t new but, in the past, this action would replace the layer on the second image so you would lose all your previous work. Now, however, the copy and apply layers function adds (rather than replace) layer(s) to the new image. And you can even choose which layer(s) to copy from the Adjustments Clipboard. A little extra bonus: You can copy layers to pretty much any image, regardless of size/dimensions or file format.
New Crop Tool
Finally, you can now lock the aspect ratio when cropping an image. Just hold the shift key while adjusting the new handles that appear when the crop tool is selected. Hold down the Opt/Alt key to keep the crop centered on the image. This works best for portraits or other compositions where the main subject is centered in the frame.
Improved HDR
The previous version made no sense to me since the Highlight and Shadow sliders were pegged to the left starting at zero and only went one way up to 100. Now they’re more in line with other sliders, with zero in the center and moving to 100 percent in both directions. Version 20 also adds white-and-black sliders that, in conjunction with setting up Exposure Warnings, make it easier to avoid clipping. Overall, this is a great improvement from the previous HDR tools.
Improved Noise Reduction Algorithms
Pro 20 has noticeable improvement in noise reduction. It is one click simple to “upgrade” to the version 20 algorithm.
Bottom Line:
Capture One Pro is an excellent image-editing program and, personally, it’s my favorite for tethering, too. The updates in Capture Pro 20 offer some marked improvements in areas such as color adjustments, navigation and, perhaps more importantly, efficiency. Some of the updates, including the ability to have text descriptions under tool bar icons, make the software a bit more user friendly especially to those new to Capture One Pro and that’s always a plus. But thanks to some of the new features, pros will benefit from a speedier, smoother workflow.
Price: $299 (perpetual license);
from $159 (upgrade);
from $15/month (subscription)
Lower prices are available for Capture One Pro for Sony and Fuji
www.captureone.com/store
Related Articles
13 Photo Editing Programs: From Classics to 360-Degree Image Retouching Tools
Related Articles