There are a wide range of continuous LED lights on the market these days, from small to large and cheap to expensive. Many of them have some fantastic and advanced features, including app control, DMX and crazy effects modes. Sometimes, though, you just need something small and simple. That’s where this creation from Luke Willmott steps in.
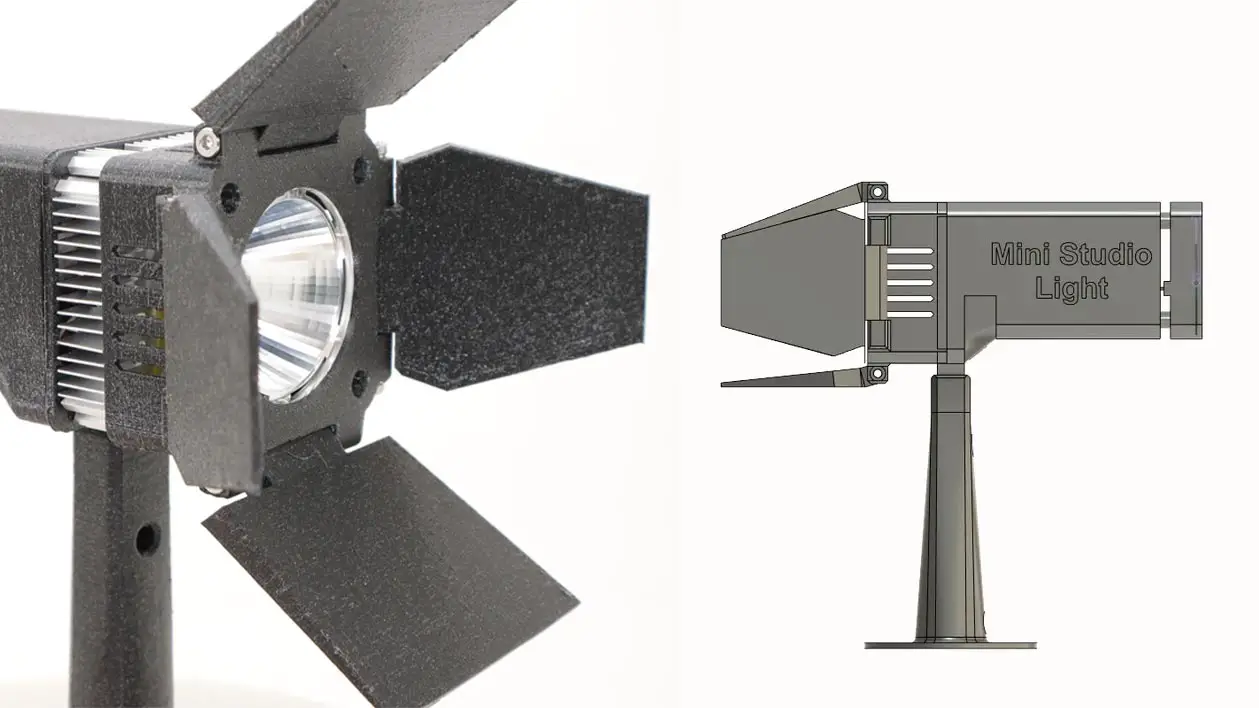
It’s a modular 3D printable 10-30W COB LED spotlight with options for barndoors, gel filters, an OLED display, infrared remote control, temperature monitoring and more. The design is based around a VGA heatsink to keep the COB LED cool, controlled by a Raspberry Pi Pico and Meanwell LDH driver. It holds a lot of potential, particularly for small-scale sets.
Luke’s design is quite elegant and efficient. With the popularity of small-scale subjects like toy photography, product photography and even macro photography, a handful of these might be just the ticket to cover your small lighting needs. With accessories like barndoors and gels, you can get a lot of control over the colour and shape of your light with these for small sets. Despite being quite small and looking rather simple from the outside, a lot of components and work goes into making one of these. So, it’s not for the faint of heart.
The 3D printable files are available to download on Printables, the code is on GitHub, and the custom PCB files are available to download here. Luke also put up a complete assembly guide on Instructables, listing all of the required components. The two most important parts to get right, though, are the LED and the driver. Naturally, you want a high CRI LED – unless you plan to shoot just black and white – and a driver that matches your chosen LED.

Luke used 19x19mm COB LEDs he found on AliExpress with a Meanwell LDH-25-700 LED driver. The size of the LED is important in order for it to fit into the housing, but the power is also very important. The project says to use a 10-30W LED, although they’re available at up to 54W. The problem with going to high, however, is heat generation. A VGA heatsink, even with a fan, is only going to be able to take away so much heat. And as the housing is 3D printed using thermoplastics, you don’t want it to melt because you used too strong an LED.
You can, to some degree, overcome this issue depending on the material you print with. PLA is going to have the lowest melting point, but you can get a bit more temperature resilience printing with PETG, ABS, ASA, Nylon or polycarbonate filament. If you build one, or several, of these, I’d keep an eye on it the first few times you use it, just to make sure there isn’t too much heat build up.

While making DIY LEDs, as opposed to simply buying some, might not have been something you’d considered before, this looks to be a viable project for those with a soldering iron, a 3D printer and some time on their hands. If you want to build a few of these, getting a production line going for each step should help speed up the time requirements.
You can download the 3D printable files on Printables, the Raspberry Pi Pico code on GitHub, the Gerber files for the PCB here, and the complete assembly guide on GitHub. Luke does note that the Raspberry Pi Pico firmware has a couple of bugs left in it, but as the whole project is open source, you can fix them yourself and submit code back to Luke if you crack it!
Overall, it’s a very impressive-looking design for the DIY-inclined small-scale photographer or filmmaker. I think I might have to make a few of these myself at some point!


